Tech/HowTo/Install OpenWRT on TP-Link OnHub
About
Google developed a ChromeOS based router software that was used by some companies like TP-Link to create "OnHub" devices. Just like many things Google canceled the administration of the device so it could no longer be configured. The device of topic today is named TGR1900 OnHub Router but you will not find the model number printed on the device.
USB Port
Warning: This is the biggest problem!
For reasons that are unknown the USB 3.0 port on the OnHub likes USB memory devices of 2.0 version that are 4GB or larger for booting. I wasted a ton of time finding this out. I had success with a 4GB Sandisk Cruzer Micro that is old. It also has an LED showing activity which came in very helpful. I would say that most issues with installing OpenWRT onto the OnHub have to do with the USB memory device meeting this requirement.
Requirements
- You have read and understand the USB Port section above
- USB Memory device/stick
- Small hex wrench to remove the developer button screw and to press the button
- Knife to uncover the developer button
- Pen or pokey device to press reset button
- Network cable plugged into the LAN port (Up and Down Arrow with vertical lines)
- A small network switch
- A computer (Linux or MacOSX)
- Recovery image from Google
- OpenWRT installer image (Factory)
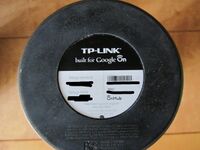
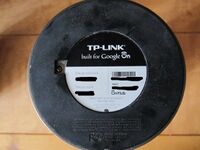
Developer Button
- Before
- After
Process
It is possible to install OpenWRT directly but myself and others have found that doing a factory reset helps.
Factory Reset
- Insert the USB memory device into your computer
- Identify the device
- lsblk
- Unzip the recovery image.
- unzip chromeos_9334.41.3_whirlwind_recovery_stable-channel_mp.bin.zip
- Write the recovery image to USB memory device
- dd if=chromeos_9334.41.3_whirlwind_recovery_stable-channel_mp.bin of=/dev/sdX
- Wait for completion, then run on Linux `sync` to extra double confirm it is done writing
- Remove USB memory device from computer and get ready to work on the OnHub
- OnHub power unplugged
- Pokey thing holding the reset button near the power port
- Plug the power into the OnHub
- Look for the LED light to be white, then flashing orange, and then flashing red
- Remove pokey thing from the reset button
- Insert the USB memory device
- Look for the LED light to turn off
- Wait ~5 minutes for the recovery
- Look for the LED to pulse a teal or blue color
- Remove the power plug, the USB memory device
- You now have a factory reset OnHub
Actual OpenWRT Install
- Download the OpenWRT Factory image
- Rename the OpenWRT install image for ease of use later making note of the version number I replaced with Zs
- mv openwrt-ZZ.ZZ.Z-ipq806x-chromium-tplink-onhub-squashfs-factory.bin openwrt-tplink-onhub-factory.bin
- Plug USB memory device into computer
- Identify the block device
- lsblk
- Write the OpenWRT installer to the block device noting the version that I replaced with Zs
- dd if=openwrt-tplink-onhub-factory.bin of=/dev/sdX
- Wait
- When it says it is done, do an extra Linux "sync" to double triple check
- Cut out the rubber to the right of the label on the bottom as noted in the section above
- Power plug removed
- Install the USB memory device
- Connect the network LAN port to your switch
- Configure you computer to have network of 192.168.1.2/24 and 192.168.86.2/24
- ip addr add 192.168.1.2/24 dev devicename
- ip addr add 192.168.86.2/24 dev devicename
- Note the 192.168.86.0 network is for the factory default so you can ping it if the new 192.168.1.0 network does not work
- Using pokey thing, press and hold the reset button near the power port
- Plug in the power
- Look for LED light to turn white, then flashing orange, then flashing red
- Stop pressing the reset button with the pokey thing
- Press the developer mode button on the bottom of the OnHub using the hex wrench
- Look for the LED light to flash purple. There may be a momentary green which is normal.
- Wait ~10s
- Listen for two beeps
- Press developer mode button on the bottom
- Look for LED light to turn off
- Wait ~30s
- Look for LED light to show a rainbow
- Ping the OnHub
- ping 192.168.1.1
- It can take up to a minute to come online and the ping gives you a status of when it is ready.
- Test the OnHub
- ssh root@192.168.1.1 ls
- Copy the OpenWRT installer to the OnHub temp
- scp -O openwrt-tplink-onhub-factory.bin root@192.168.1.1:/tmp/
- Zero out the eMMC to make sure there is no conflict
- ssh root@192.168.1.1 -C "dd if=/dev/zero bs=512 seek=7552991 of=/dev/mmcblk0 count=33"
- Write the firmware to the eMMC
- ssh root@192.168.1.1 -C "dd if=/tmp/openwrt-ipq806x-chromium-tplink_onhub-squashfs-factory.bin of=/dev/mmcblk0 bs=1M"
- Unplug the power plug
- Remove USB memory device
- Replace the developer mode screw on the bottom of the OnHub
- Unconfigure your computer networking setup with 192.168.1.2/24
- Plug in the power plug on the OnHub
- OnHub with OpenWRT can take ~2 minutes to be ready, you will hear beeps
- Configure your computer to use DHCP to get an address
- In a webbrowser open up http://192.168.1.1
- Username root and no password
- Set a password
- Connect WAN interface (note you may want to configure LAN if your network conflicts with 192.168.1.1)
- In software menu, update package list and do package upgrades
- Write down the username and password and attach to bottom of router
- Enjoy
Status
I successfully completed this process on two OnHubs 2024-03-14
Resources
- https://www.tp-link.com/us/home-networking/wifi-router/tgr1900/
- https://openwrt.org/inbox/toh/google/onhub_tp-link_tgr1900
- https://www.reddit.com/r/GoogleWiFi/comments/10uy553/working_openwrt_builds_available_for_onhub_routers/
- https://forum.openwrt.org/t/reviving-a-google-onhub-tplink-tgr1900/172537
- https://www.exploitee.rs/index.php/Rooting_The_Google_OnHub
- https://www.ifixit.com/Teardown/OnHub+Teardown/48129

